HOW TO: Megane Ph 1 to Ph 2 Rear Lights Conversion...
Moderators: q292u, Ray, AndyAdmin, Stranger
- Nige
- Advanced Driver
- Posts: 277
- Joined: Tue Jul 15, 2008 9:59 am
- Currently Drives:: 03' Renaultsport Megane 1.4 16v...NO FAULTS HERE! :-D
- Location: N.Ireland, Londonderry
- Contact:
HOW TO: Megane Ph 1 to Ph 2 Rear Lights Conversion...
Hi Guy's
As by some demand a few people has asked me to put up photos of how i done my tail light conversion...here is a few snaps with details...
Hope this helps!
Phase 1 Lights
Phase 2 Lights
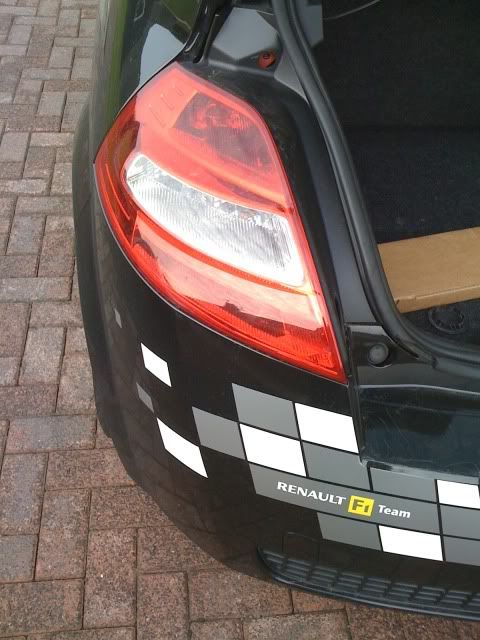
The Guide...
1. Firstly unscrew the tail lights from both sides and disconnect the plugs...
2. Cut the wires off plug off (Leave as much wire length as you possibly can! on all!)
3. Get these connectors...obtainable from maplin shops (you need 13) 6 for the passenger side/7 for the driver side(UK) vice versa for Left hand drive..
4. Strip the wire back about 1cm each...and crimp the connector on the wire (with wire crimps, scissor like things)
5. Put electrical tape around the connectors apart from the bit your plugging in (obviously) to avoid shorts when plugging wires in side by side... you will see like i have done in the photos.
5. PASSENGER SIDE (UK CARS)
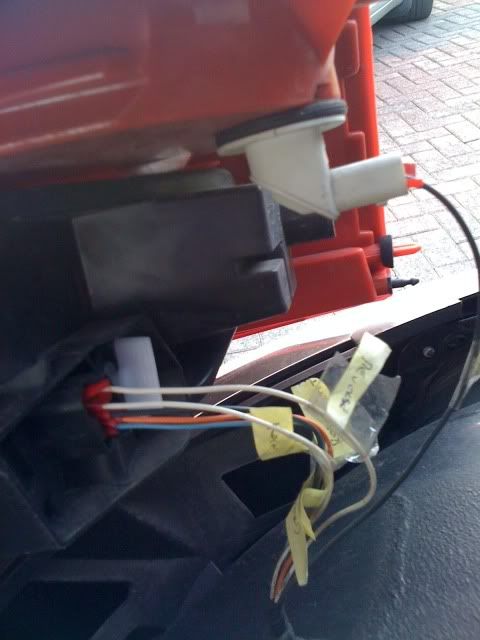
From the images (ALL BLACK WIRES ARE GROUND)
Top Bulb = Fog (Does not work on this side UK CARS)
Pin 1 = Ground
Pin 2 = Nothing (Either pin dosent matter, dead anyway)
Lower Cluster (Refering to Picture)
Pin 1 (Top) = White (Reversing Light)
Pin 2 = White (Indicator)
Pin 3 = Black (Ground)
Pin 4 = Orange (Brake Light)
Pin 5 (Bottom) = Brown and Blue (Side Light's)
There is 2 white non-colour coded wires...dont be afraid to test as its trial and error...you may have to swap around...example...reversing light may be indicator bulb..you get the drift just swap pin 2 to 3, 3 to 2.....
DRIVER SIDE
There is now 3 white wires to deal with...again this is trail and error....you cant blow anything so dont be scared!! it's actually quite fun!
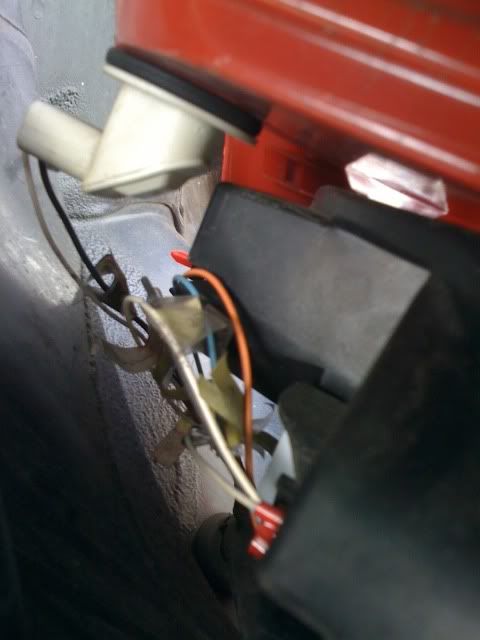
Top Bulb = Fog (works on this side UK CARS)
Pin 1 = White
Pin 2 = Black (Ground)
Lower Cluster (Refering to Picture) (Same as passenger side)
Pin 1 (Top) = White (Reversing Light)
Pin 2 = White (Indicator)
Pin 3 = Black (Ground)
Pin 4 = Orange (Brake Light)
Pin 5 (Bottom) = Brown and Blue (Side Light's)
Happy Modding folks!!!! Enjoy!
Hope this helps you all! Really nice modification!! 30 min job
Last edited by Nige on Thu Apr 22, 2010 7:25 pm, edited 1 time in total.
03' Megane 1.4 16v 3Dr, N.Ireland
-
- Passed Theory
- Posts: 29
- Joined: Fri Mar 05, 2010 3:33 pm
- Currently Drives:: '04 Renault Megane 1.9 Dci 120 Dynamique - 3 Door - Black - Lowered -45 - 225 bumpers - Tints - Alloys
Re: HOW TO: Megane Ph 1 to Ph 2 Rear Lights Conversion...
Thanks for the post Nige, was going to ask you how you did yours got one rear light off ebay so ill be getting the other soon!
Megane 1.9 DCI 120, 3 dr, Black, Tints, HIDs, -45 Springs, 225 Bumpers, Alloys, Phase 2 rear lights, Carbon badge, LED Interior, French pressed plates
- Anthony
- Rally Driver
- Posts: 842
- Joined: Mon Jun 15, 2009 6:52 pm
- Currently Drives:: 2005 Renault Megane 1.5 dci 100
- Location: Preston
Re: HOW TO: Megane Ph 1 to Ph 2 Rear Lights Conversion...
Great post! This should be made into a 'sticky'.
2005 1.5dci 100 Sport Hatch -Gone!
-
- Advanced Driver
- Posts: 259
- Joined: Wed Feb 03, 2010 11:21 am
- Currently Drives:: 03 Megane 3 door 2.0 VVT Dynamique - Sunroof, 17" Alloys, Keyless Entry and start
55 Grand Espace Initial, Xenons, Leather, Sunroof, Keyless, Sat Nav, Tyre Pressure sensors, 18" Alloys, Roof spoiler/bars. - Contact:
Re: HOW TO: Megane Ph 1 to Ph 2 Rear Lights Conversion...
I wonder if people will start doing the Ph1 to Ph2 facelift like people did with the old Megane and Renault 19s.
- Jammie667
- Passed Theory
- Posts: 45
- Joined: Thu May 07, 2009 1:18 pm
- Currently Drives:: Megane II Dynamique 1.9 DCI 120
- Contact:
Re: HOW TO: Megane Ph 1 to Ph 2 Rear Lights Conversion...
wouldn't it make sense to mark all the white wires when you're taking the phase 1 lights to bits? Put little sticky labels on them so you know which lights they're for.
'04 1.9 DCI 120 Dynamique - 5Dr Hatch - Metallic Red
Bought 4th April 09
Bought 4th April 09
- madwedge
- Pass Plus
- Posts: 160
- Joined: Mon Aug 09, 2010 9:37 am
- Currently Drives:: 2004 Renault Megane 2.0 litre 16v VVT Dynamique
- Location: Southend-on-Sea
Re: HOW TO: Megane Ph 1 to Ph 2 Rear Lights Conversion...
Hi
I just wanted to link in this thread to the sticky too as it has additional info on Part Numbers, Looms and wiring etc.
Megane Facelift Rear light Cluster Part No's Here
I've found it a good read.
Thanks
I just wanted to link in this thread to the sticky too as it has additional info on Part Numbers, Looms and wiring etc.
Megane Facelift Rear light Cluster Part No's Here
I've found it a good read.
Thanks
Currently Driving: 2004 Renault Mégane Dynamique 2.0 litre 16v VVT
-
- Passed Theory
- Posts: 35
- Joined: Sun Jul 04, 2010 1:18 pm
- Currently Drives:: 1.5dci Megane
Re: HOW TO: Megane Ph 1 to Ph 2 Rear Lights Conversion...
Good guide. I thought it would be a case of unplug one plug the new one in! What were Renault thinking?
- Sadret89
- Advanced Driver
- Posts: 412
- Joined: Fri Sep 18, 2009 12:52 am
- Currently Drives:: RENAULT MEGANE 1.5dci 80, INDUCTION KIT, 8K XENON HEADLIGHTS, 225 SPORT FULL BODY-KIT & EXHAUST SYSTEM, SOUND SYSTEM, TDI TUNING BOX, EDC BLACK STUFF FRONT BRAKE PADS
Re: HOW TO: Megane Ph 1 to Ph 2 Rear Lights Conversion...
I'm just a little confused. Do you still keep the connector of the old lights and plug it into the new ones?
Check out the progress viewtopic.php?f=13&t=13676
Re: HOW TO: Megane Ph 1 to Ph 2 Rear Lights Conversion...
Good guide. Typical of Renault to use white for two different functions (oh and I think they are different from right to left too!). I found this out the hard way fitting a towing bracket and 12N trailer plug. Inside the car, I had to strip the insulation from one of the whites and meter it with brake/indicator/etc on to tell one from the other.
Personally, I prefer the look of the phase 1 lights (that nice slanting sidelamp)...
Silver 08 plate 5dr 1.5dci Dynamique 106 Tech Run (re-mapped)
Red 03 plate 5dr 1.9 Dynamique dci120
Best advice for Megane owners: sell it before it bankrupts you!
Red 03 plate 5dr 1.9 Dynamique dci120
Best advice for Megane owners: sell it before it bankrupts you!
- Sadret89
- Advanced Driver
- Posts: 412
- Joined: Fri Sep 18, 2009 12:52 am
- Currently Drives:: RENAULT MEGANE 1.5dci 80, INDUCTION KIT, 8K XENON HEADLIGHTS, 225 SPORT FULL BODY-KIT & EXHAUST SYSTEM, SOUND SYSTEM, TDI TUNING BOX, EDC BLACK STUFF FRONT BRAKE PADS
Re: HOW TO: Megane Ph 1 to Ph 2 Rear Lights Conversion...
Check out the progress viewtopic.php?f=13&t=13676
- Sadret89
- Advanced Driver
- Posts: 412
- Joined: Fri Sep 18, 2009 12:52 am
- Currently Drives:: RENAULT MEGANE 1.5dci 80, INDUCTION KIT, 8K XENON HEADLIGHTS, 225 SPORT FULL BODY-KIT & EXHAUST SYSTEM, SOUND SYSTEM, TDI TUNING BOX, EDC BLACK STUFF FRONT BRAKE PADS
Re: HOW TO: Megane Ph 1 to Ph 2 Rear Lights Conversion...
I've fitted mine today, passenger side with a bit of trial and error which was in fact fun, perfect!
The drivers side I got it all to work except the side light doesnt work when lights are turned on but works when brake is pressed, any ideas?
Check out the progress viewtopic.php?f=13&t=13676
- Sadret89
- Advanced Driver
- Posts: 412
- Joined: Fri Sep 18, 2009 12:52 am
- Currently Drives:: RENAULT MEGANE 1.5dci 80, INDUCTION KIT, 8K XENON HEADLIGHTS, 225 SPORT FULL BODY-KIT & EXHAUST SYSTEM, SOUND SYSTEM, TDI TUNING BOX, EDC BLACK STUFF FRONT BRAKE PADS
Re: HOW TO: Megane Ph 1 to Ph 2 Rear Lights Conversion...
Anyone?
Check out the progress viewtopic.php?f=13&t=13676
- ikhan
- Advanced Driver
- Posts: 524
- Joined: Sun Sep 12, 2010 10:02 pm
- Currently Drives:: Megane 1.5 DCi (106)
Re: HOW TO: Megane Ph 1 to Ph 2 Rear Lights Conversion...
Did mine today - I must say it must have been the easiest mod so far, carried out in between attending the builder's as well.
Tail lamp and brake lamp are the easiest to do (as well as the earth) as the wires are the same colour on both plugs (assuming you use the plug off an car with the newer lights fitted as I did). It's the indicator, reverse, and fog lamp that you need to test for as the wires to these are all white!
I left the original plugs in place as well - I just used scotch lock connectors.
Renault Megane 1.5dCi (106)
Lowered 45mm (Spax)
RenaultSport R26 Front & Rear Bumpers, Spoilers, Door Bullets, & Exhaust
6000k HIDs (H7 & H11), LED Side, No Plate, & Interior Lights
18" Inovit Tarmac Alloys (matt black)
Lowered 45mm (Spax)
RenaultSport R26 Front & Rear Bumpers, Spoilers, Door Bullets, & Exhaust
6000k HIDs (H7 & H11), LED Side, No Plate, & Interior Lights
18" Inovit Tarmac Alloys (matt black)
Re: HOW TO: Megane Ph 1 to Ph 2 Rear Lights Conversion...
Does anyone out there make and sell direct plug and use replacement connectors to simplify the upgrade for the people that don’t like fiddling with their cars , anyone fancy making one for me I will pay
-
- Posts: 1
- Joined: Mon Mar 18, 2019 9:26 am
Re: HOW TO: Megane Ph 1 to Ph 2 Rear Lights Conversion...
thedools wrote:Thanks for the post Nige, was going to ask you how you did yours got one rear light off ebay so ill be getting the other soon! PhenQ | https://phenq-reviews.com
All of these are converted to the things you can't even modify
Who is online
Users browsing this forum: No registered users and 8 guests